 A functional guide for Handshake users A functional guide for Handshake users

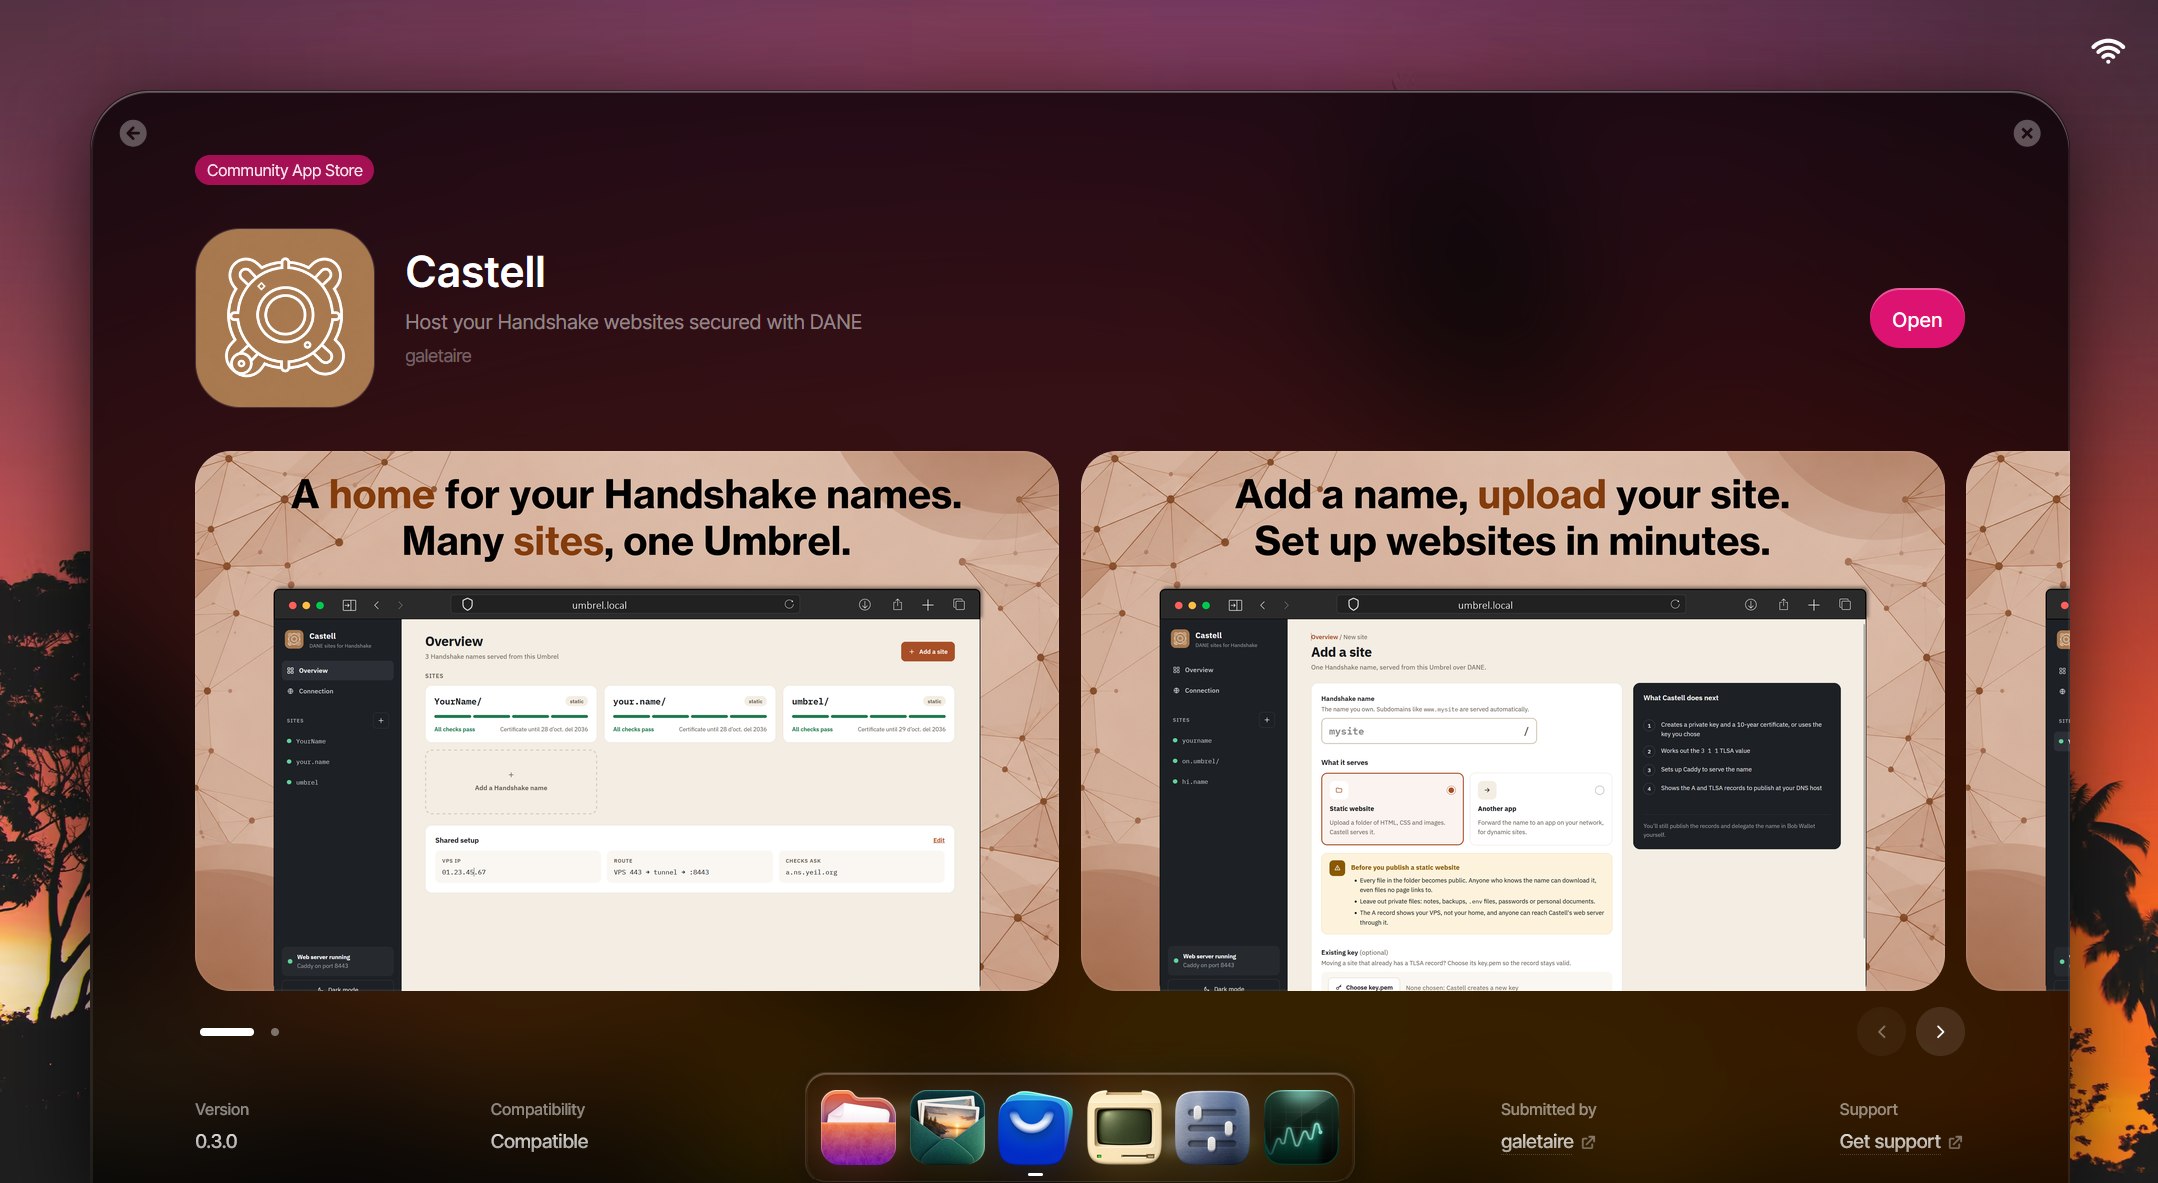
Umbrel is a home server where you can run your own Handshake node. With Castell running on it, you can host your own static https site on a Handshake name, secured with DANE instead of a certificate authority.
Note: Castell is an app that creates the private key and certificate for your TLD, computes the TLSA record and configures the web server (using Caddy). It gives you the records to add at your DNS host and the VPS / port-forwarding rule to set it up. Finally, it stores and serves the files for your website.
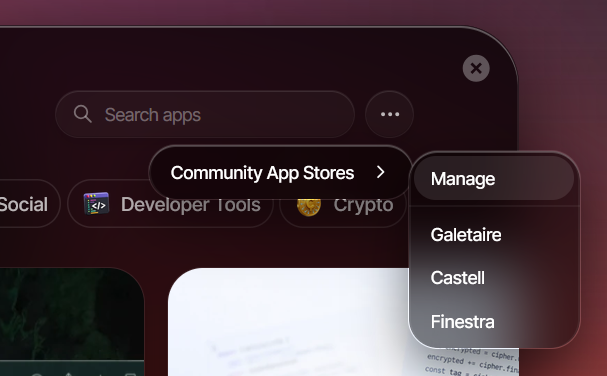
Installing Castell is as simple as installing any other Umbrel community app: go to App Store → Community App Stores → Manage, paste https://github.com/galetaire/castell and install Castell.
You'll need a TLD held in your own Bob Wallet or Namebase Wallet, plus a small amount of HNS (10 HNS is more than enough). If you're new to Handshake, you can get some HNS from the faucet.
Once you have some HNS, you can bid on TLDs in name auctions using Bob or Namebase. Both are self-custodial wallets that let you take part in the auctions directly.
Yeil DNS is a service that lets you point your self-custodied TLD to its nameservers, so you can manage your domain records without giving up custody of your TLD. At any time, you can use your wallet to remove the records that point your TLD to Yeil, ending the connection.
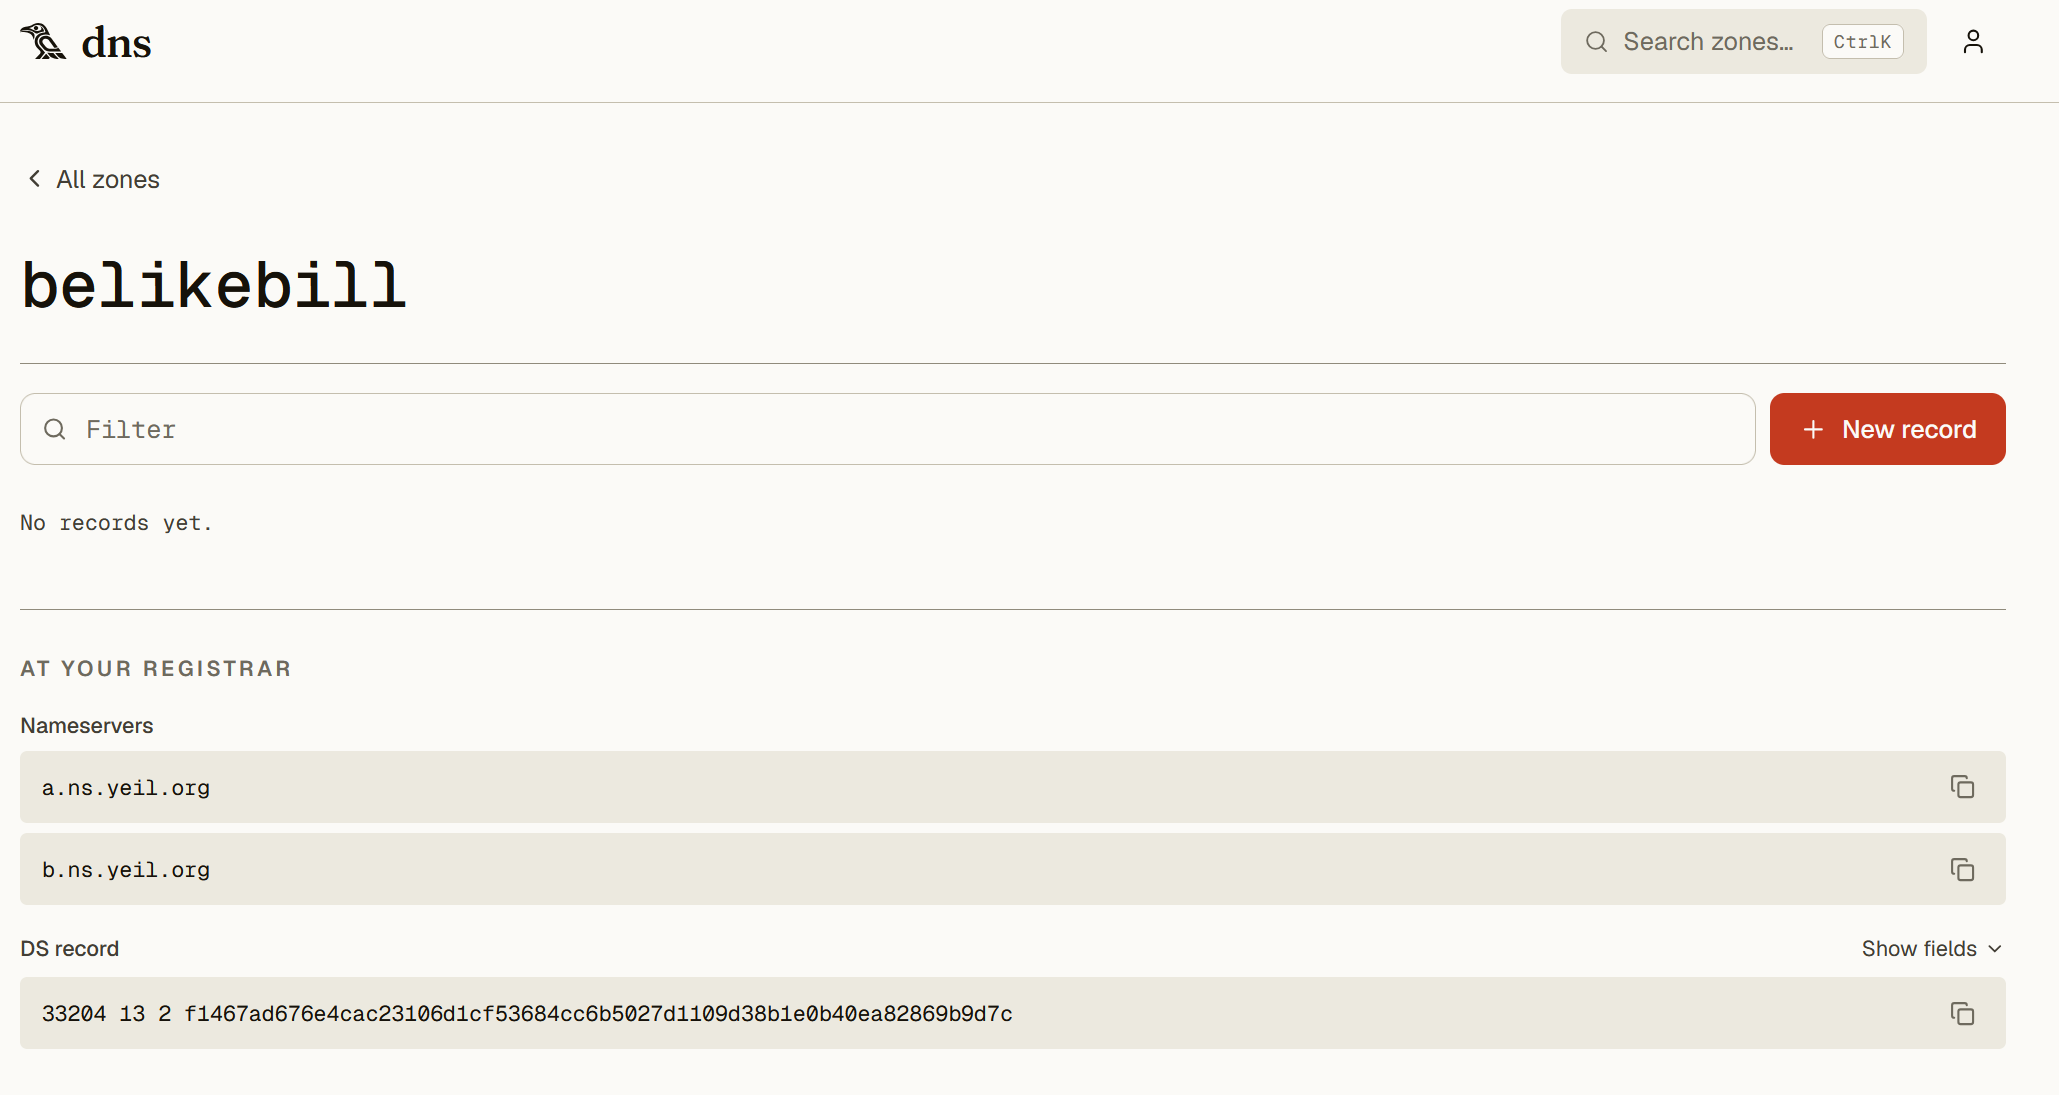
You need to connect your TLD (in your wallet) to Yeil DNS. In your Yeil account, go to New zone, type the TLD name you own, and click Add. Once it's created, it will show the records you need to add to your TLD in Bob Wallet to create the connection.
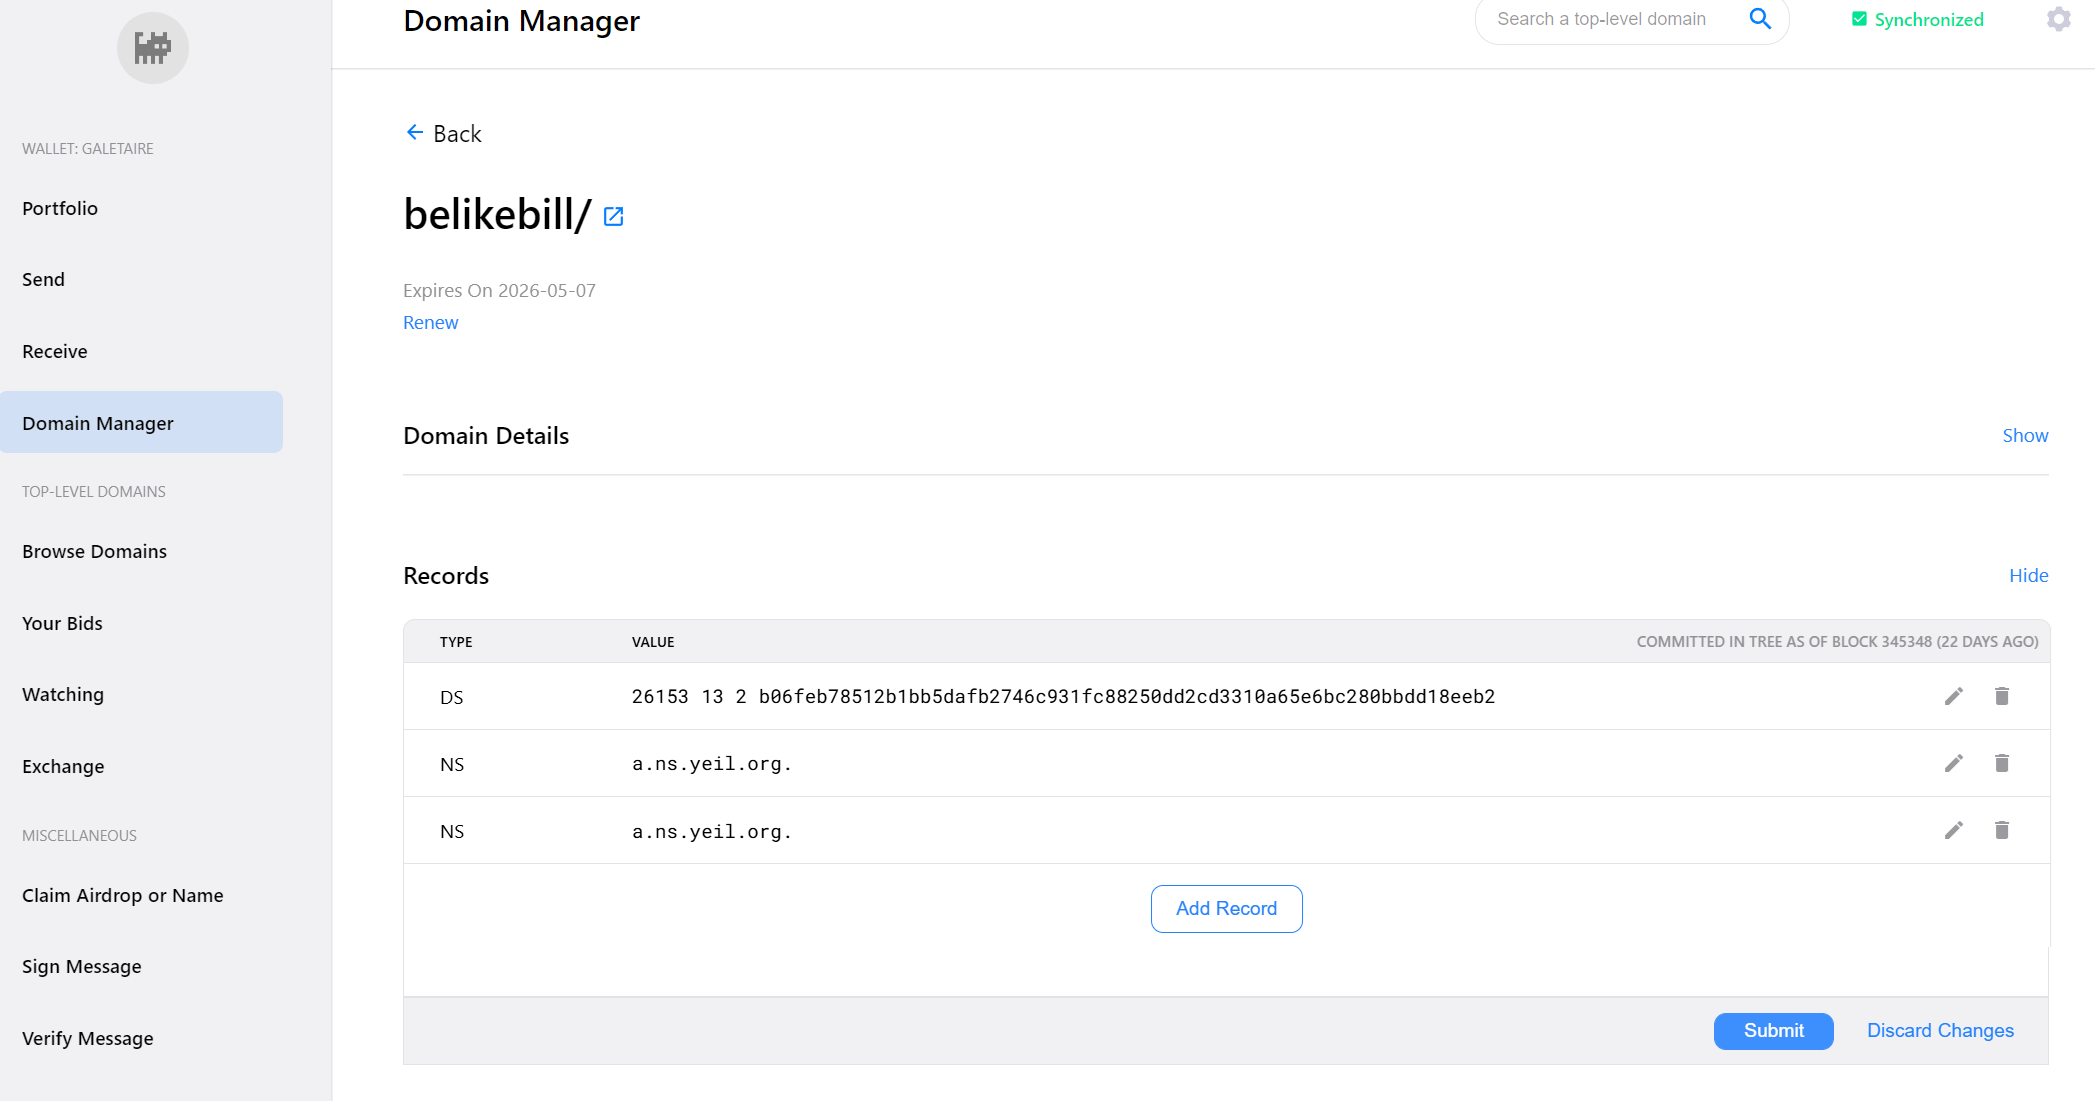
In Bob Wallet, go to Domain Manager and click your TLD to open a new screen. In the Records section, add the records provided by Yeil:
a.ns.yeil.org; add a dot . at the end if you get errors, e.g. b.ns.yeil.org.Click Submit to save the changes. Updating takes roughly 10–20 minutes (the time for each block to be minted). After that, you should be able to see the new records on any HNS explorer, such as Shakeshift.
At this point we move to the Castell app, and the guide splits into two different paths, depending on how you decide to deliver your static site to visitors:
If you choose this path, after saving your changes under Connection, check that the Public IP field shows your actual public IP address, and that the Umbrel LAN IP field shows your Umbrel's IP address on your local network.
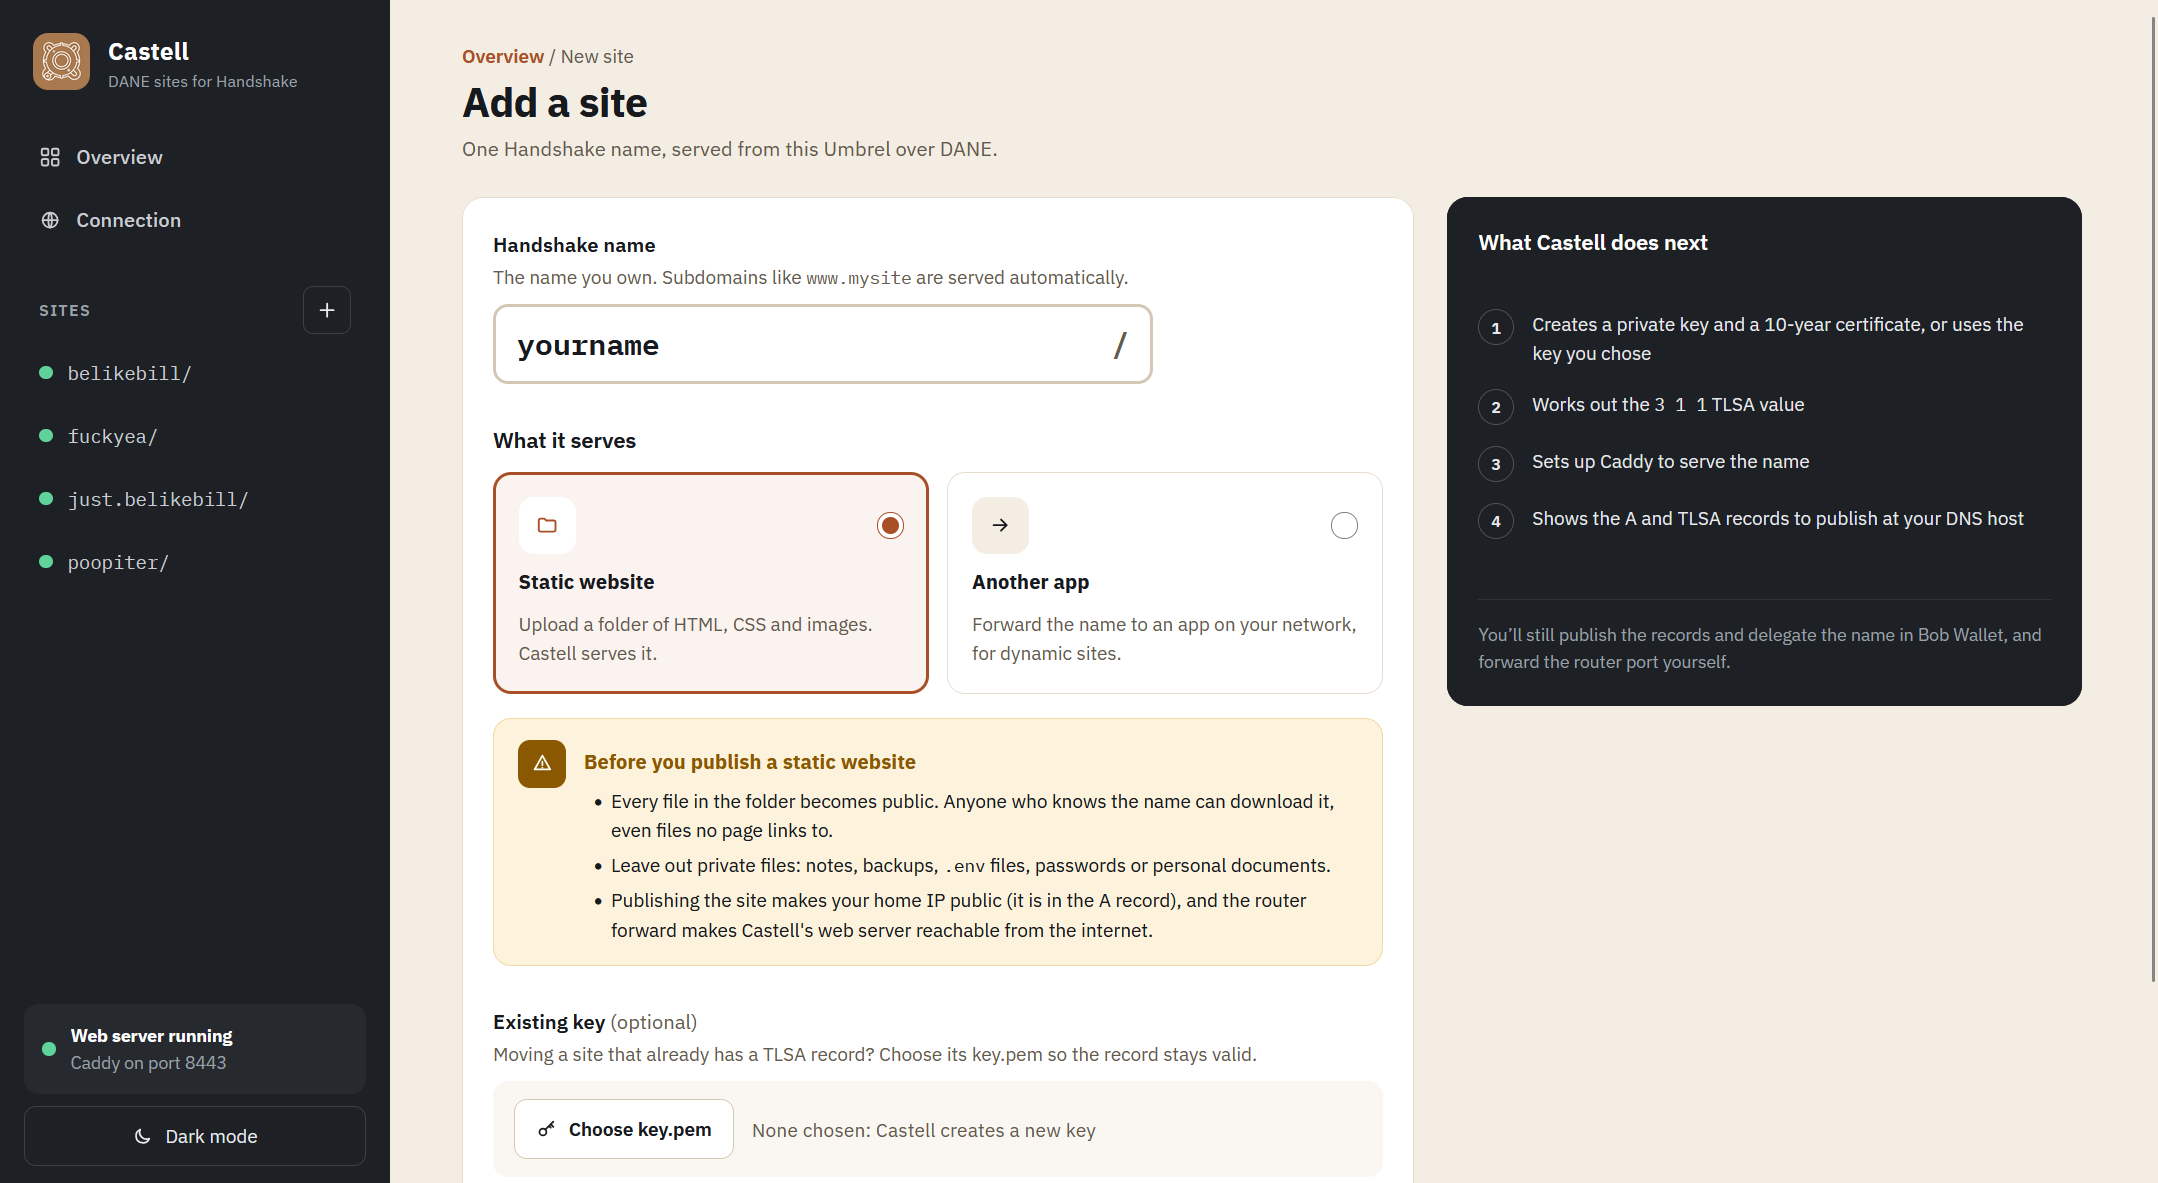
Once the site connection is defined, you need to Add a site: in the window that opens, type the name of your TLD, then select Static website. As you can see, there is also an Another app option. It is meant for hosting dynamic sites, which require more technical skill. I strongly advise against setting up a dynamic site through router port forwarding unless you fully understand the security risks. Otherwise, stick to a static site (HTML, CSS and JS), which offers almost no attack surface, apart from making your IP public (becoming increasingly undesirable in the age of AI, which is why Path B is recommended).
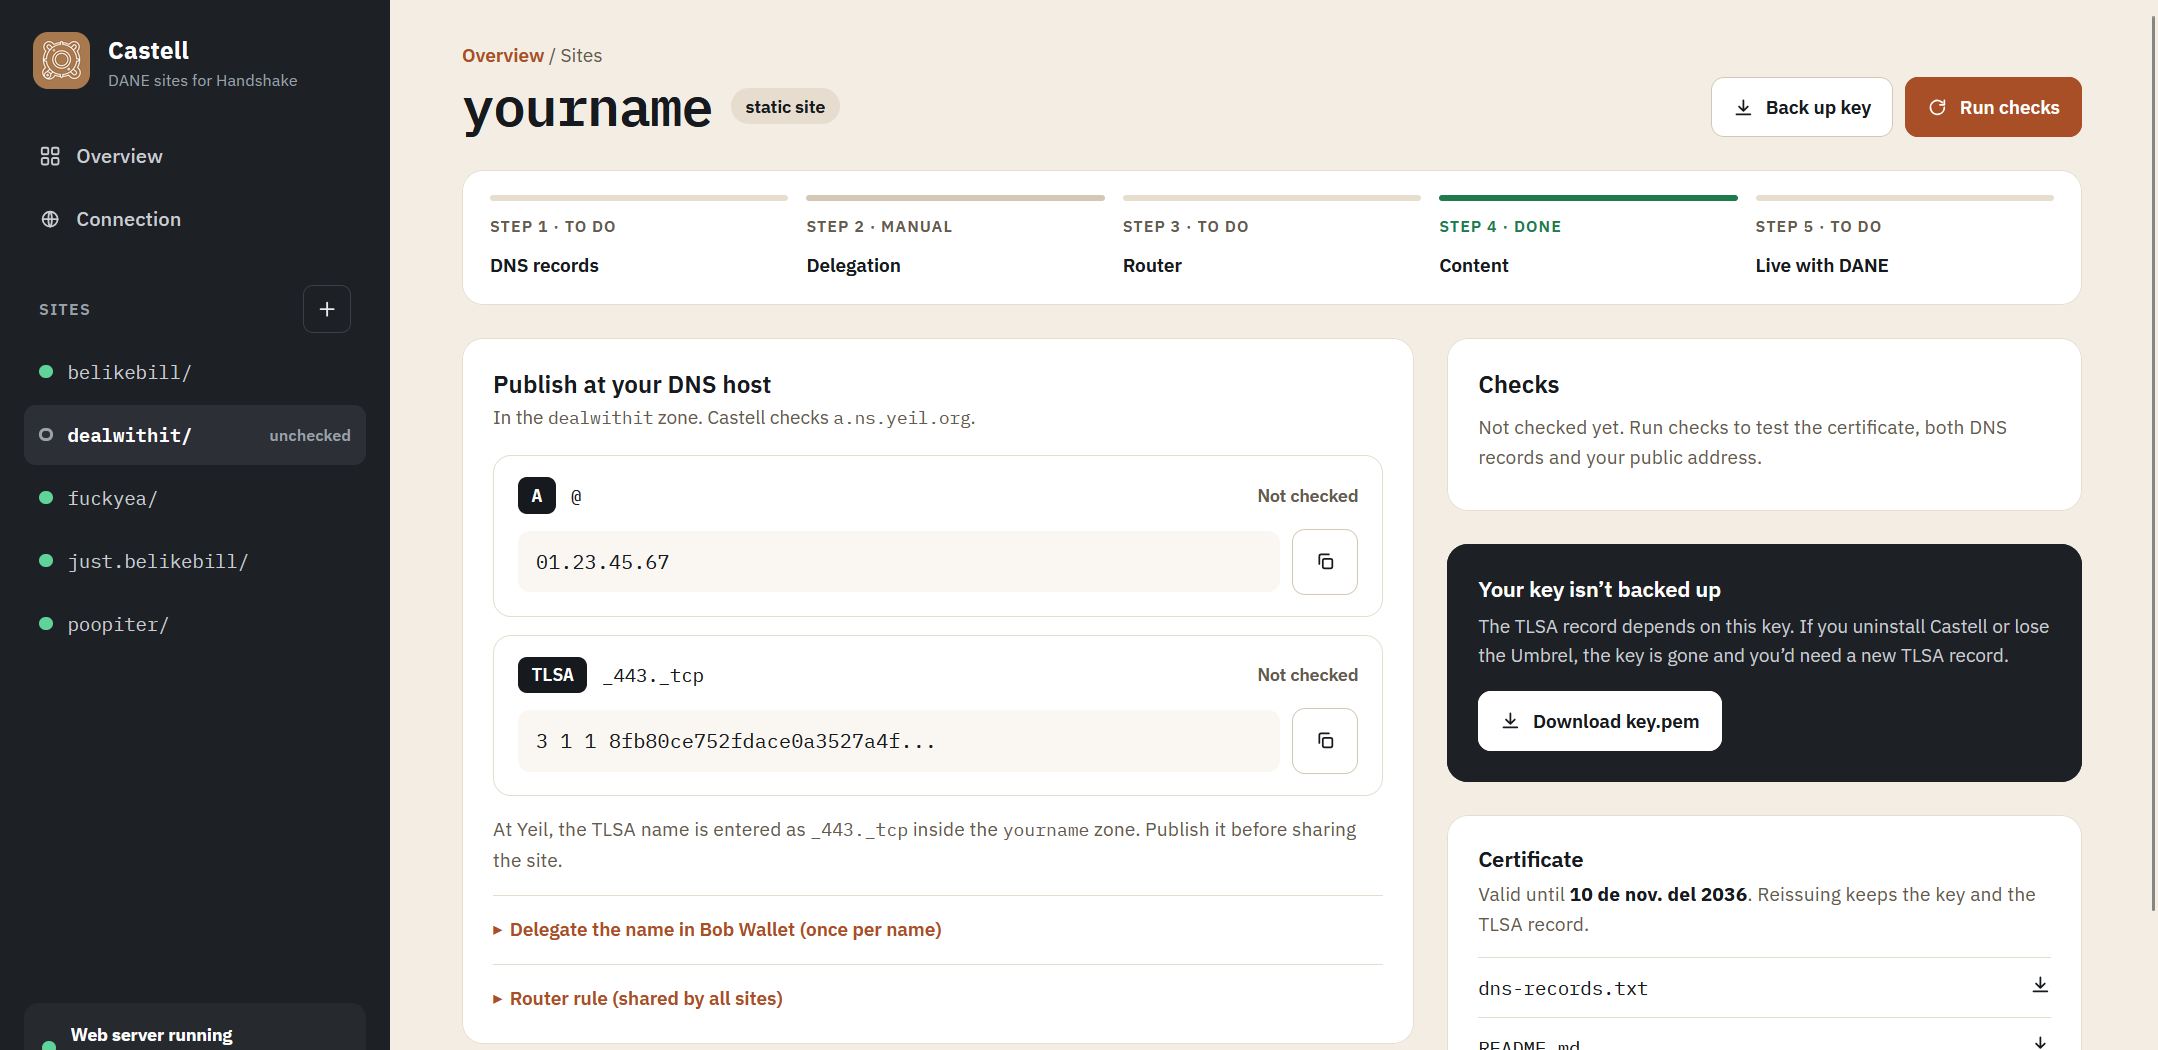
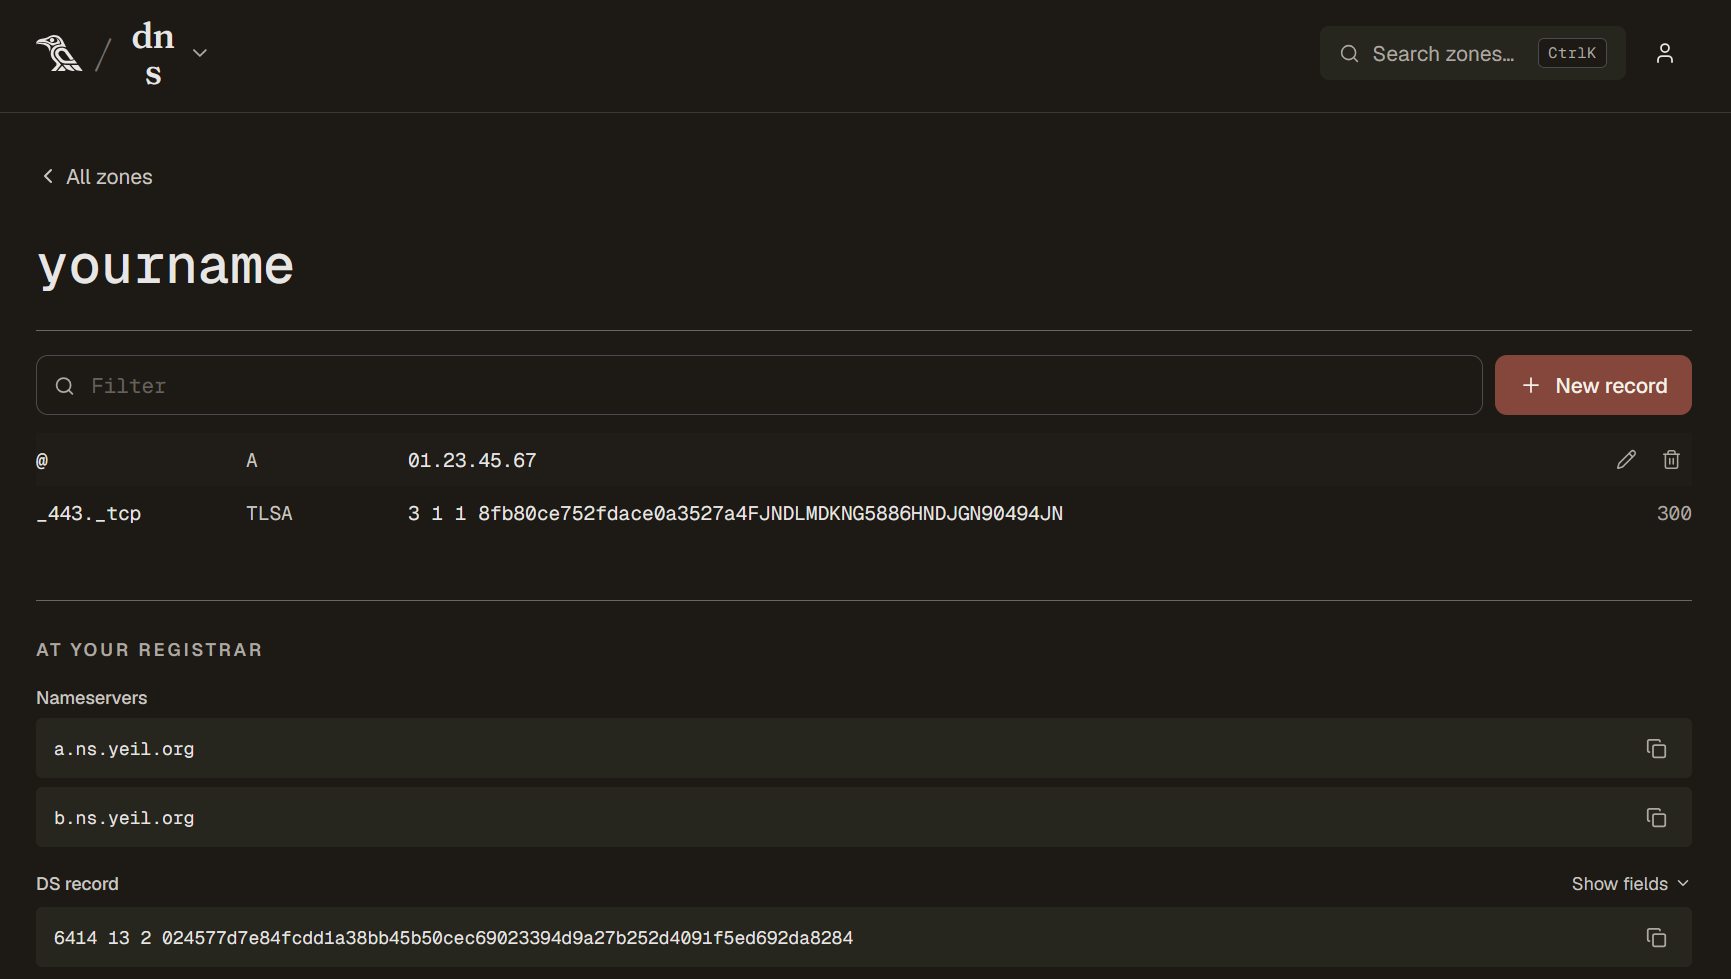
The new site will appear in your main menu. Open it to configure the site. In the top bar you will see a five-step checklist you need to complete. Step 1 is DNS records: go to Yeil DNS, open your TLD there, and add the two records that Castell shows you (A and TLSA).
| Name | Type | IPv4 address |
|---|---|---|
@ | A | Your public IP address |
| Name | Type | Certificate data (hex) |
|---|---|---|
_443._tcp | TLSA | The hash string from the TLSA record shown in Castell. Yeil DNS fills in the 3 1 1 prefix automatically, so don't type it: paste only the string that comes after those first three numbers. |
Step 2 of the five-step checklist is Delegation, which we already completed in section 4. Connect your domain: Bob Wallet ↔ Yeil. Run checks can't confirm this step, but that's fine: if Step 1 passes, delegation is set up correctly.
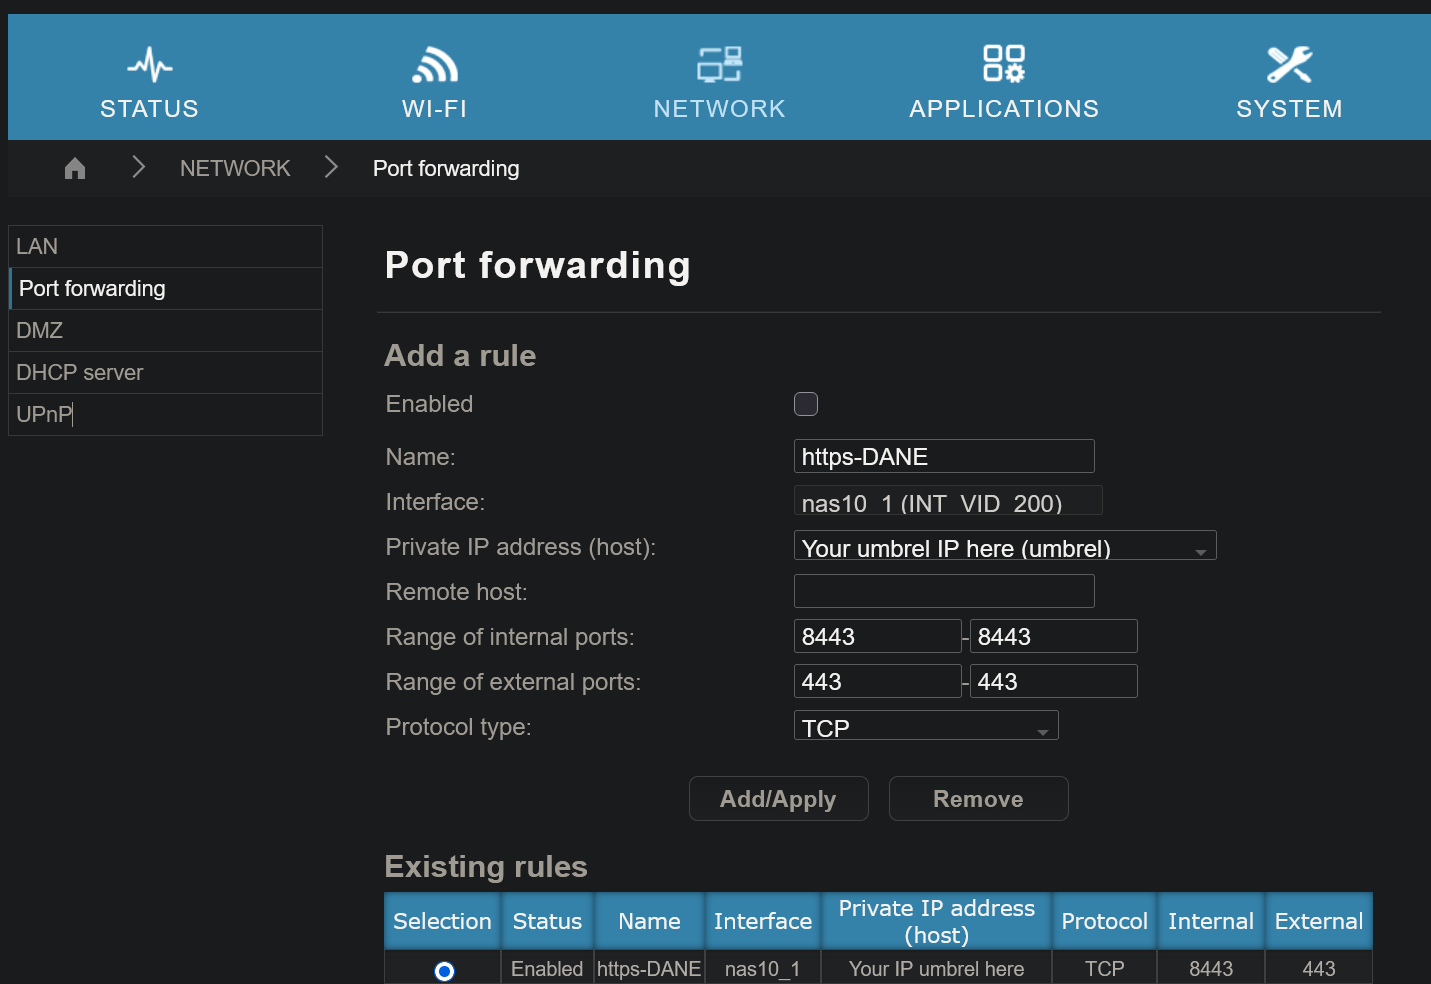
Step 3 is about opening port 443 on your router. Type your router's IP address into your browser to open its settings page. Every router's interface is a bit different, but port forwarding is usually under the network settings. Create a new rule and give it a name you'll recognize, such as https-DANE. Set the internal port range to 8443–8443 and the external port range to 443–443, select TCP as the protocol, then add or apply the rule. It should appear as enabled, which means port 443 is now open. Finally, go back to Castell and run the checks again; Step 3 should turn green.
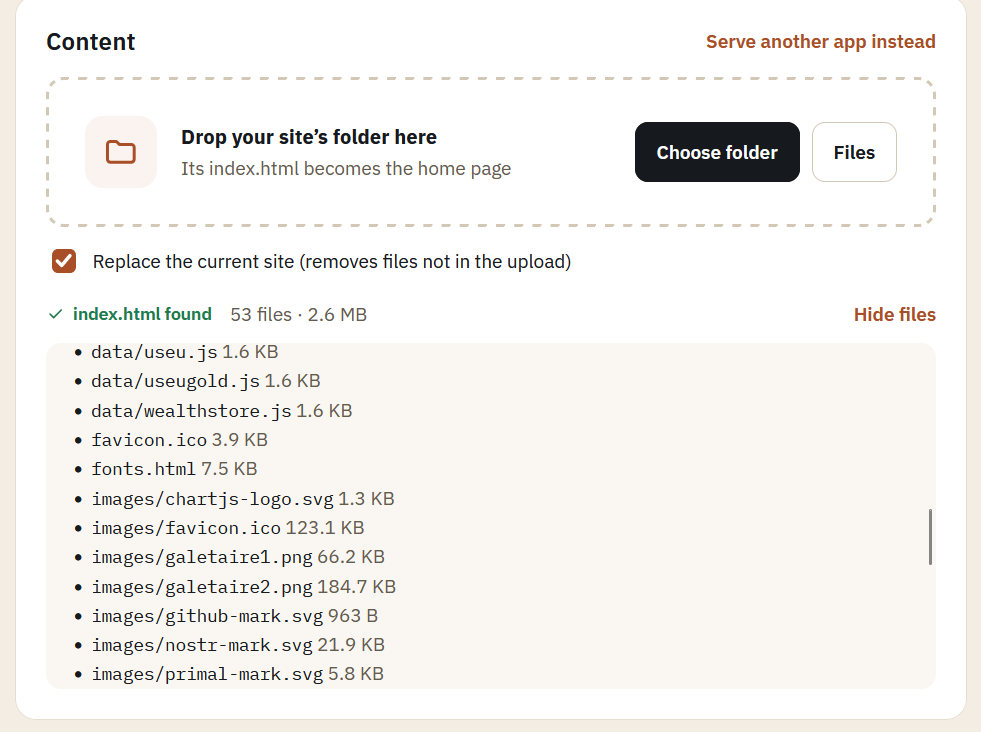
Step 4 is uploading your website files. Castell automatically adds a test index.html, so you don't need to upload your own site until you've confirmed it's live. If you'd rather upload it now, that's fine too: you can upload individual files or a whole folder with subfolders, and the folder structure and paths will be kept.
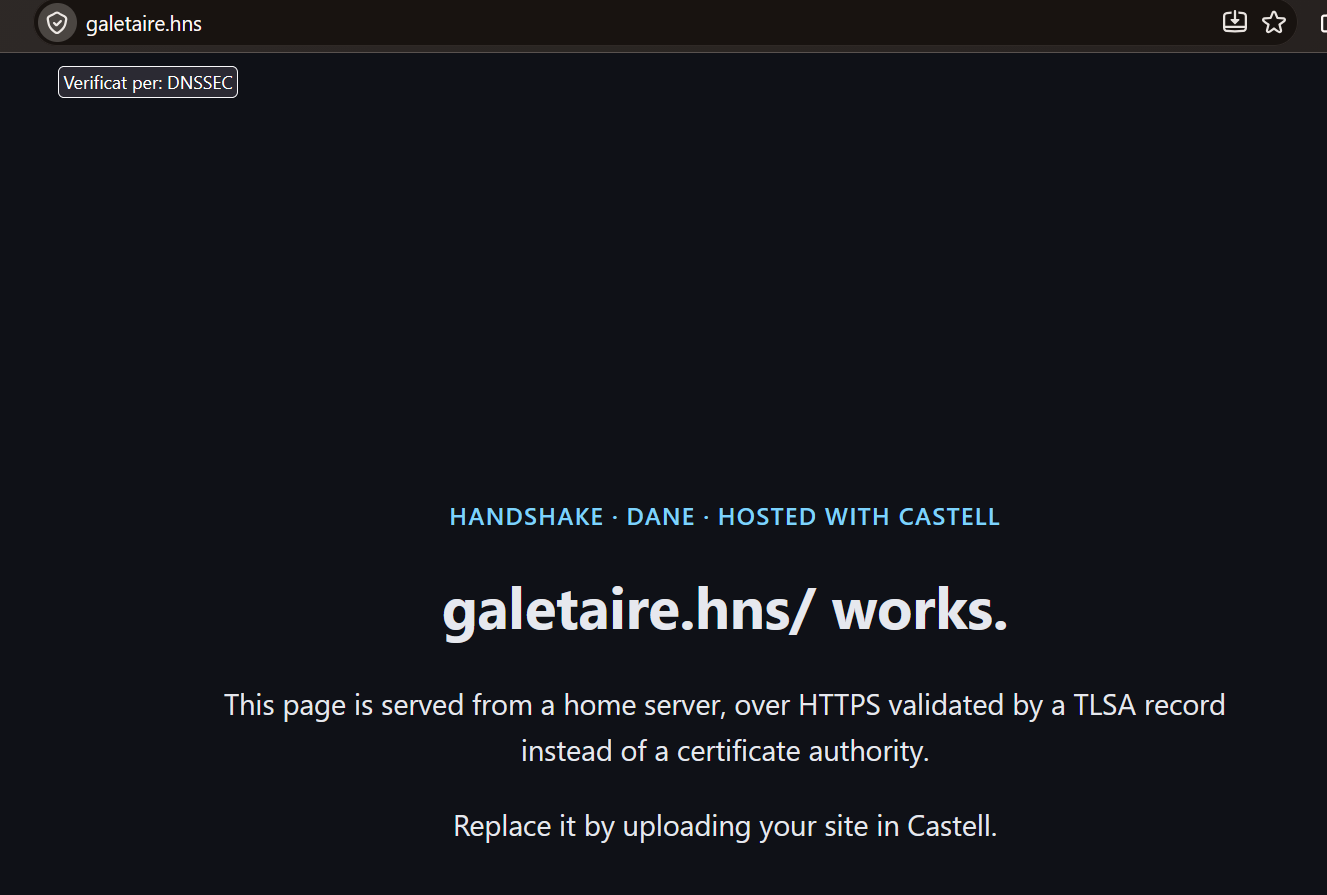
Step 5 confirms that your site is live and set up correctly. Click Run checks again: if Step 5 and all the previous steps are green (except Step 2, Delegation, which isn't checked), your site is live. You can then open it in your browser. To be sure it really works, try it from a different internet connection than your home router's, for example your phone's mobile data.
After that, your site should be online at your domain 🎉! Remember, if your goal is to keep your site online, you should consider adding a VPS to your setup for security reasons. This is explained in Path B.
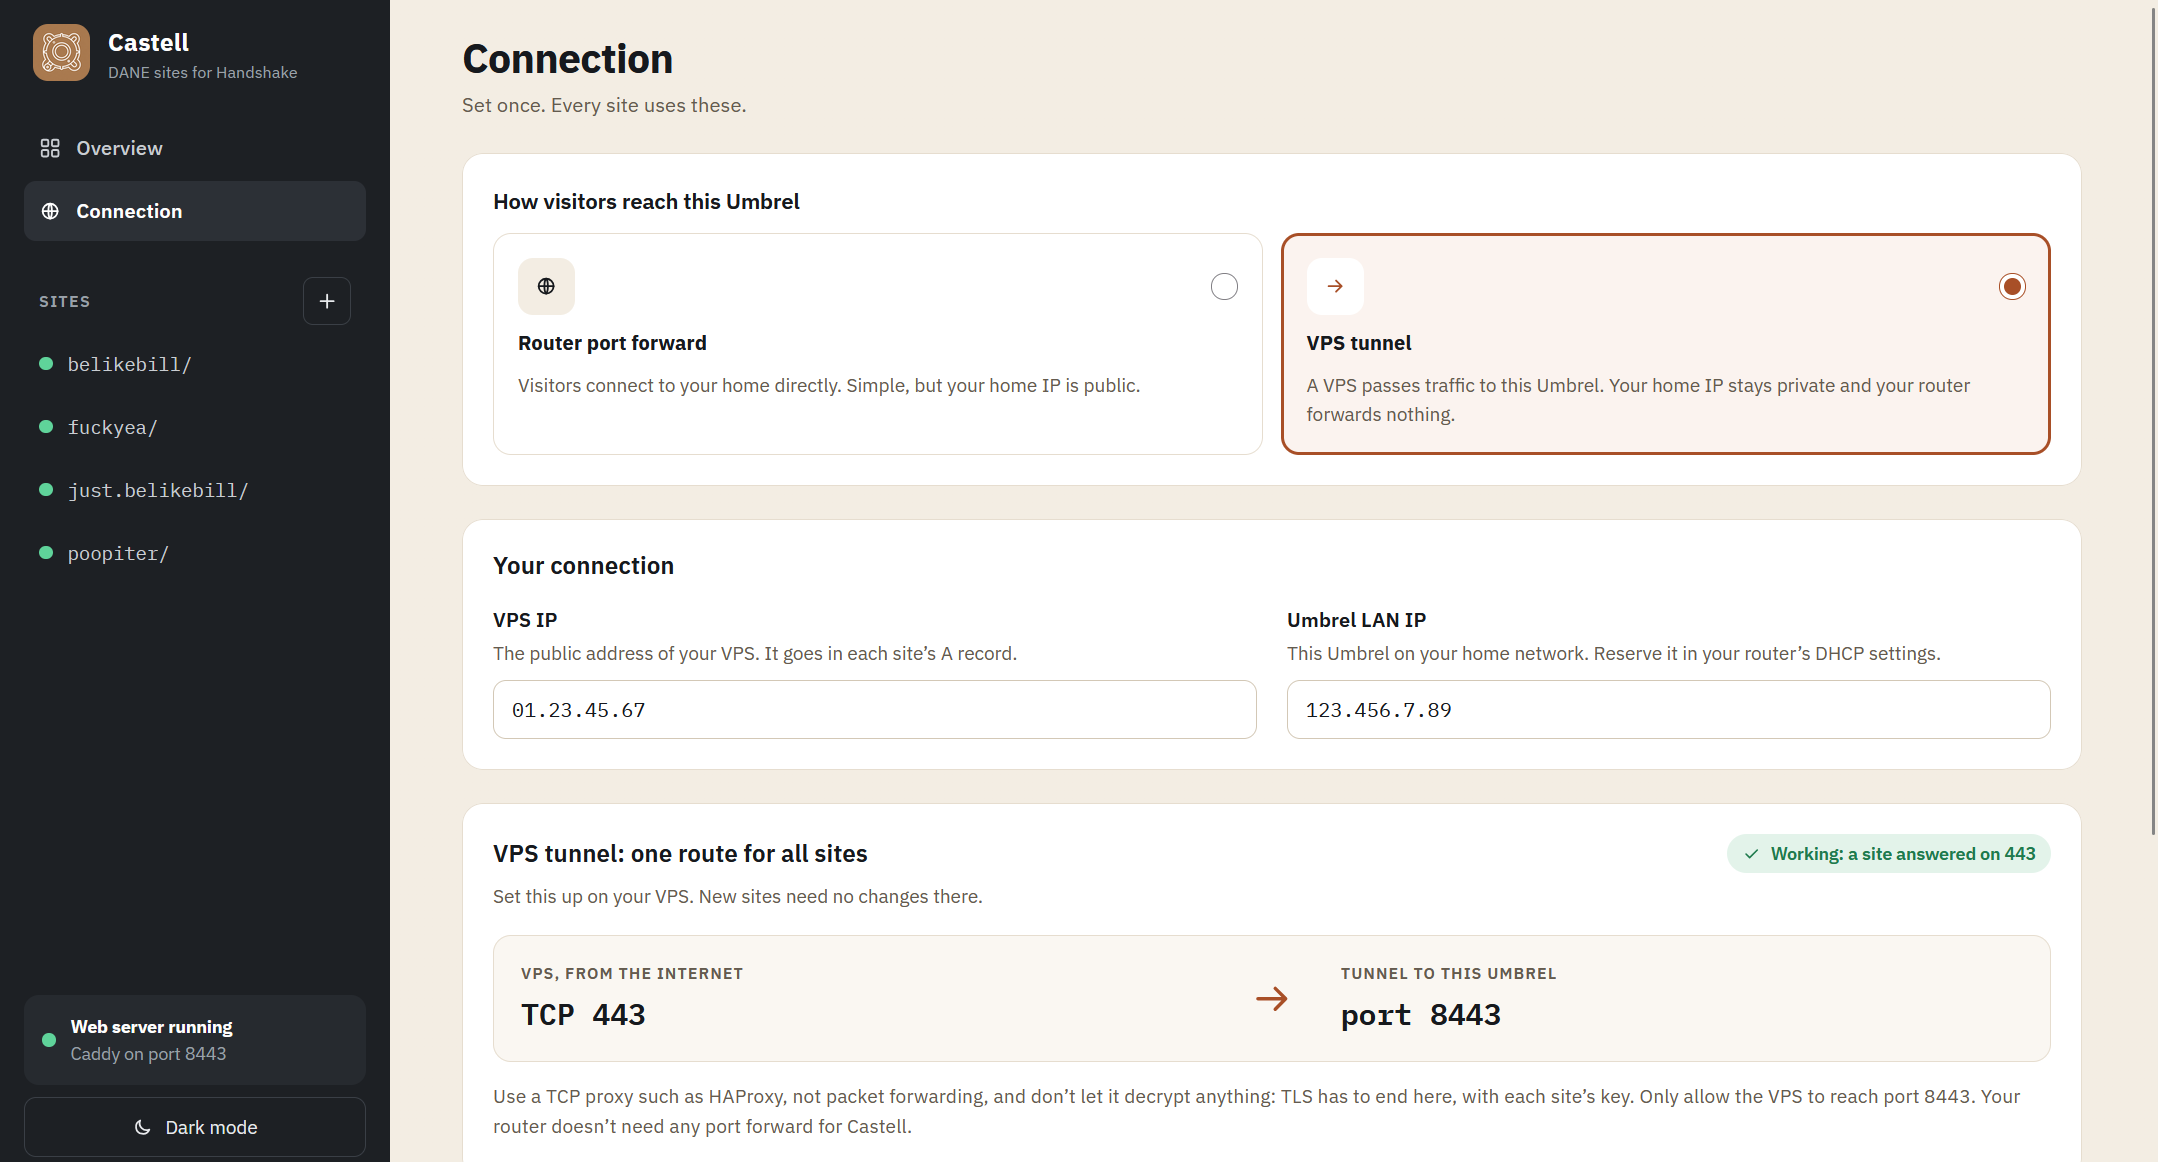
This path gets you to the same result as Path A without opening any port on your router. A small VPS stands in front of your Umbrel: visitors connect to the VPS, and HAProxy on the VPS passes their encrypted traffic, without decrypting it, through a Tailscale tunnel to Castell. TLS still ends on your Umbrel with your site's own key, so DANE keeps working, and even a compromised VPS can't impersonate your site. Your home IP stays out of DNS.
The Castell side is almost the same as in Path A. The difference is Step 3 of Castell's checklist: instead of a router rule, you set up the VPS and the tunnel below, and Castell shows that step as VPS.
The commands below use placeholders in capitals. Replace them with your own values when necessary:
| Placeholder | Meaning | Example |
|---|---|---|
VPS_IP | The VPS's public IPv4 address, from your provider | 203.0.113.10 |
UMBREL_TS_IP | Your Umbrel's Tailscale address (you get it in step B4) | 100.101.102.103 |
UMBREL_LAN_IP | Your Umbrel on your home network | 192.168.1.27 |
HOME_IP | Your home's public IP, only used to check that it's closed (step B8) | 198.51.100.20 |
SITE | Your Handshake TLD, for testing | yourtld |
Each command says where it runs: PowerShell on your PC, or on the VPS, in an SSH session whose prompt starts with root@. The commands are for Windows; on macOS or Linux, use the Terminal instead.
The VPS only relays encrypted traffic, so the smallest plan is enough. When ordering any:
An SSH key lets your PC log in to the VPS without a password. All of this step runs in PowerShell on your PC.
First, create a key. Skip this if you already have one in C:\Users\<you>\.ssh\. Press Enter to accept the default location; a passphrase is recommended. The SHA256:... fingerprint it prints belongs to your new key, so it is supposed to be different from the server's.
ssh-keygen -t ed25519Then copy the public key to the VPS:
Get-Content $env:USERPROFILE\.ssh\id_ed25519.pub | ssh root@VPS_IP "mkdir -p ~/.ssh && chmod 700 ~/.ssh && tr -d '\r' >> ~/.ssh/authorized_keys && chmod 600 ~/.ssh/authorized_keys"On this first connection, SSH shows the server's fingerprint and asks whether to continue. Compare it with the line of the same type (ED25519, ECDSA or RSA) in the welcome email. If it matches exactly, type yes and enter the root password from the email. If it doesn't match, type no and don't enter the password: you may not be talking to your server. To see the server's fingerprints before connecting, you can run ssh-keyscan VPS_IP | ssh-keygen -lf -.
Now log in with the key. It should not ask for the root password (it may ask for your key's passphrase). If it does ask for the root password, the key wasn't copied: repeat the previous command.
ssh root@VPS_IPThis step installs updates, turns off password login, allows only ports 22 (SSH) and 443 (HTTPS), and turns on automatic security updates with a reboot at 04:00 when one is needed. Paste the whole block on the VPS. It can take a few minutes, and your session stays connected because port 22 is allowed before the firewall turns on.
export DEBIAN_FRONTEND=noninteractive
apt update && apt -y full-upgrade
apt -y install ufw unattended-upgrades

cat > /etc/ssh/sshd_config.d/10-hardening.conf <<'EOF'
PasswordAuthentication no
KbdInteractiveAuthentication no
PermitRootLogin prohibit-password
EOF
sshd -t && systemctl reload ssh

ufw default deny incoming
ufw default allow outgoing
ufw allow 22/tcp
ufw allow 443/tcp
ufw --force enable

cat > /etc/apt/apt.conf.d/20auto-upgrades <<'EOF'
APT::Periodic::Update-Package-Lists "1";
APT::Periodic::Unattended-Upgrade "1";
EOF
cat > /etc/apt/apt.conf.d/52automatic-reboot <<'EOF'
Unattended-Upgrade::Automatic-Reboot "true";
Unattended-Upgrade::Automatic-Reboot-Time "04:00";
EOF
systemctl enable --now unattended-upgrades

sshd -T | grep -E '^(passwordauthentication|permitrootlogin|kbdinteractiveauthentication)'
ufw status verbose
The last lines should show this (without-password is OpenSSH's other name for "keys only"):
permitrootlogin without-password
passwordauthentication no
kbdinteractiveauthentication no
Status: active
...
22/tcp     ALLOW IN    Anywhere
443/tcp    ALLOW IN    Anywhere
Before closing anything, keep this SSH window open and log in again from a new PowerShell window with ssh root@VPS_IP. If that works, you can't lock yourself out. If you ever do, your provider's control panel has a console for the server.
Finally, reboot to load any new kernel, log back in after a minute, and check the kernel version against your distribution's security tracker. For example, Debian fixed CVE-2026-98432 in Debian 13 with kernel 6.12.113.
rebootuname -rTailscale gives the VPS a private, encrypted path to your Umbrel. The connection goes out from your home, so your router needs no open port for it. Nothing public changes in this step.
Then add the VPS. On the VPS, run this; tailscale up prints a login link, which you open in your browser to approve the device with the same account:
apt -y install curl
curl -fsSL https://tailscale.com/install.sh | sh
tailscale up
Tailscale logins expire after about six months by default, which would silently take your site down. In the Tailscale admin page, under Machines, open the ⋯ menu of each device (the VPS and the Umbrel) and choose Disable key expiry.
Now test the tunnel. On the VPS, list the devices and note your Umbrel's address, which starts with 100.: that is your UMBREL_TS_IP.
tailscale statusThen check that the VPS reaches Castell through the tunnel. It should show subject: CN=SITE and HTTP/2 200:
curl -skv --resolve SITE:8443:UMBREL_TS_IP https://SITE:8443/ -o /dev/null 2>&1 | grep -E 'subject:|HTTP/|Connected to|Failed|timed out'The VPS faces the internet, so treat it as something that could be hacked. A Tailscale access rule makes sure that, even then, it can only reach Castell on your Umbrel and nothing else. Do this before step B6 makes the VPS public.
In the Tailscale admin page, open Access controls, replace everything in the JSON editor with this (with your UMBREL_TS_IP), and save. The first rule keeps your own devices working normally; the second lets anything tagged vps reach only port 8443 of your Umbrel.
{
  "tagOwners": {
    "tag:vps": ["autogroup:admin"]
  },
  "acls": [
    {"action": "accept", "src": ["autogroup:member"], "dst": ["*:*"]},
    {"action": "accept", "src": ["tag:vps"], "dst": ["UMBREL_TS_IP:8443"]}
  ]
}
Then, under Machines, open the ⋯ menu of the VPS, choose Edit ACL tags, add tag:vps and save. Check that the limit works, on the VPS:
curl -sk -o /dev/null -w 'Castell: %{http_code}\n' --resolve SITE:8443:UMBREL_TS_IP https://SITE:8443/
curl -s -m 5 -o /dev/null -w 'Umbrel dashboard: %{http_code}\n' http://UMBREL_TS_IP/ || echo "Umbrel dashboard: blocked, good"
You should get Castell: 200, then Umbrel dashboard: 000 and blocked, good. 000 means no answer, which is what you want. If the dashboard line shows any other number, stop: the rule isn't working yet.
HAProxy listens on port 443 of the VPS and sends each connection on to Castell through the tunnel. It runs in TCP mode, so it never decrypts anything. Two things to avoid here: a service that decrypts traffic (Cloudflare Tunnel, Tailscale Funnel) breaks DANE, and plain packet forwarding (iptables DNAT) would pass attackers' raw packets through to your Umbrel's kernel. A proxy opens a fresh connection instead, so those packets stop at the VPS.
On the VPS, paste this block with your UMBREL_TS_IP. It should end with active and Through HAProxy: 200:
apt -y install haproxy
cp /etc/haproxy/haproxy.cfg /etc/haproxy/haproxy.cfg.original

cat > /etc/haproxy/haproxy.cfg <<'EOF'
# Passes encrypted traffic to Castell on the Umbrel, without decrypting it.
global
    log /dev/log local0
    user haproxy
    group haproxy
    maxconn 2000

defaults
    mode tcp
    log global
    option tcplog
    timeout connect 5s
    timeout client 1m
    timeout server 1m

frontend https_in
    bind :443
    default_backend umbrel

backend umbrel
    server umbrel UMBREL_TS_IP:8443 check
EOF

haproxy -c -f /etc/haproxy/haproxy.cfg && systemctl restart haproxy
systemctl enable haproxy
sleep 3
systemctl is-active haproxy
curl -sk -o /dev/null -w 'Through HAProxy: %{http_code}\n' --resolve SITE:443:127.0.0.1 https://SITE/
Then test from outside, in PowerShell on your PC. It should print 200. HAProxy passes every name through, so if you have several sites, they all work without any per-site setup on the VPS.
curl.exe -sk -o NUL -w "%{http_code}\n" --resolve SITE:443:VPS_IP https://SITE/In Castell, open Connection, choose VPS tunnel, set VPS IP to your VPS_IP, and save (see image 5). In VPS mode the Detect button is hidden, because it finds your home IP, which is no longer the right address.
If you haven't added your site yet, add it now as in Path A: type your TLD, choose Static website, and upload your files. Then publish the records at Yeil. The A record now holds your VPS_IP; if you came from Path A, just change the A record's value and leave the TLSA record as it is, since your key hasn't changed.
| Name | Type | IPv4 address |
|---|---|---|
@ | A | Your VPS's IP address (VPS_IP) |
| Name | Type | Certificate data (hex) |
|---|---|---|
_443._tcp | TLSA | The hash string from the TLSA record shown in Castell, without the 3 1 1 prefix, which Yeil DNS fills in automatically. |
Open your site in Castell and click Run checks. All four checks should pass, and the last one should say Reachable through your VPS, port 443. If the A check still shows your home IP, the DNS change hasn't reached the nameserver yet: wait a few minutes and run the checks again.
If you never opened port 443 on your router, skip this step. Otherwise, this is the step that takes your Umbrel off the internet, so do it last, once the checks in B7 pass.
UMBREL_LAN_IP:8443). Disabling is enough, and easy to undo.TcpTestSucceeded : False means the port is closed.Test-NetConnection -ComputerName HOME_IP -Port 443That test runs from inside your network, where some routers behave differently, so confirm from outside too: on a phone with Wi-Fi off, https://HOME_IP should fail to connect, while your site should still load normally in a DANE-capable client such as Fingertip.
Visitors who type http://SITE get no answer until you add this redirect. With it, they are sent to https://SITE, keeping the same page. HAProxy answers these requests on the VPS itself, so plain HTTP never goes through the tunnel, and any site you add later gets the redirect too. Everything here runs on the VPS.
Back up the config, then add the redirect to the end of it:
cp /etc/haproxy/haproxy.cfg /etc/haproxy/haproxy.cfg.before-httpcat >> /etc/haproxy/haproxy.cfg <<'EOF'
# Plain HTTP: redirect every request to the same name and path over HTTPS.
# Answered here on the VPS; nothing goes through the tunnel.
frontend http_in
mode http
option httplog
bind :80
timeout client 10s
http-request redirect scheme https code 301
EOFCheck the config and reload HAProxy. RELOADED means the config passed the check and was loaded; if it isn't printed, nothing changed and your site is unaffected, so read the error and fix the config.
haproxy -c -f /etc/haproxy/haproxy.cfg && systemctl reload haproxy && echo RELOADEDOpen port 80 in the firewall, then test on the VPS. The answer should include HTTP/1.1 301 Moved Permanently and location: https://SITE/test:
ufw allow 80/tcpcurl -sI -H 'Host: SITE' http://127.0.0.1/test | head -3Finally, test from outside, in PowerShell on your PC. It should print 301 -> https://SITE/some/page?x=1:
curl.exe -s -o NUL -w "%{http_code} -> %{redirect_url}\n" -H "Host: SITE" "http://VPS_IP/some/page?x=1"The first http:// request isn't protected by DANE, which only covers HTTPS; that's true of any HTTP-to-HTTPS redirect.
After that, your site should be online at your domain 🎉!
Once set up, the VPS needs no routine work: it installs security updates on its own and reboots at 04:00 when one needs it, and HAProxy and Tailscale start again by themselves. To add another site, add it in Castell, publish its TLSA record and set its A record to your VPS_IP; the VPS needs no changes. Keep your Umbrel's Tailscale app running: if it stops, your sites go offline until it's back.
| What you see | Likely cause | What to do |
|---|---|---|
| Castell: "no answer from VPS_IP:443" | HAProxy stopped, or the tunnel is down | On the VPS, run systemctl status haproxy and tailscale status; on your Umbrel, check the Tailscale app |
| Castell: "answers with a different certificate" | Something on the VPS decrypts traffic, or HAProxy points at the wrong address | Check that haproxy.cfg uses mode tcp and UMBREL_TS_IP:8443 |
| Your site goes down after about six months | A Tailscale key expired | Disable key expiry for both machines (B4) and reconnect with tailscale up |
| SSH from your PC is refused | The key is missing or changed on your PC | Log in through your provider's web console and add the key to ~/.ssh/authorized_keys again |
| SSH warns that the host key changed | The VPS was reinstalled, or something is in between | Compare with your provider's fingerprints before trusting it (B2) |
| To undo | Do this |
|---|---|
| The HTTP redirect | On the VPS: cp /etc/haproxy/haproxy.cfg.before-http /etc/haproxy/haproxy.cfg && systemctl reload haproxy, then ufw delete allow 80/tcp |
| The whole VPS path, back to Path A | Re-enable the router rule, set the A record back to HOME_IP, choose Router port forward in Castell, then run the checks |
| HAProxy's config | On the VPS: cp /etc/haproxy/haproxy.cfg.original /etc/haproxy/haproxy.cfg && systemctl restart haproxy |
 Fingertip
 Bob wallet
 Finestra
 Yeil DNS
 Castell
 Coins faucet